

Hello, and welcome back! Today, we’re venturing into the magical realm of Excel automation with a look at Visual Basic for Applications (VBA), the programming language that turns Excel from a simple spreadsheet application into an automation powerhouse.
Quick note here – I typically use VBA in this setting, as it just fits better with how my mind works. You’ll probably see Excel VBA referred to as Macros more often, since that’s how it’s labeled in the tool. The relationship here is that Excel Macros are are written in VBA, which is a branch off of the Visual Basic programming language.
My brain classifies it more as a language than an Excel-specific function, because I don’t use it only for Excel macros. When we get around to the actual projects later on, we’ll likely be using VBScripts to trigger an automated Excel workbook from the task scheduler, and as you may have guessed, VBScripts use extremely similar syntax to what we’ll be seeing today.
Jeff
If you’ve ever found yourself repeatedly performing the same tasks in Excel, thinking “There has to be a better way,” then you’re in the right place. That better way is automation, and VBA is the key.
You might be thinking, “Oh no, not coding! That’s way over my head!” But let me reassure you, it’s not as scary as you might think. In fact, VBA is a fantastic place to start your coding journey. Why? Because it’s embedded right there in Excel, a tool you’re already familiar with. And because the basics of VBA can be learnt quite quickly, especially with the help of Excel’s built-in Macro Recorder which we’ll be delving into shortly.
Now, let’s discuss why you’d want to invest your time learning VBA. First, VBA can automate repetitive tasks. If you spend hours each week performing the same actions in Excel, you can write (or record) a macro to do it for you in seconds. Second, VBA can handle complex tasks that are difficult, or even impossible, with standard Excel functions and features. If you’ve ever thought, “I wish Excel could do this,” chances are, with VBA, it can!
But it’s not just about automation. Learning VBA can dramatically improve your problem-solving skills. It encourages you to think logically, and to break complex problems down into manageable parts. It’s also an in-demand skill. As businesses increasingly recognize the value of automation, VBA skills are more sought after than ever.
Before we jump into the mechanics of VBA, it’s important to understand why it’s worth your time.
For anyone thinking “Nah, no way. We have multi-million-dollar ERP systems, specialized reporting platforms, and teams of analysts. There’s no way this is relevant to me.”… If you’re right, you’re likely working for a unicorn of a company, based on my experience. It’s true that all of these things exist to create structure and tools to enable business management, but because of their increased complexity and the additional considerations that come with that complexity, development tends to be extremely slow.
While the fully productionized solution is in development for the next n months, I can almost guarantee there’s going to be a guy or gal in the office with a stack of books, several monitors, and a VERY serious relationship with caffeine working to code an intermediate solution to get the data into the hands of the people that need it. I’ve been that guy. That’s me.
Jeff
So, roll up your sleeves, grab a cup of coffee (or tea, or energy drink — we don’t judge), and let’s dive in…
Stepping into Macros: A Beginner’s Guide
Learning to code can be intimidating, but fortunately, Excel provides a fantastic entry point: the macro recorder. It translates your actions in Excel into VBA code, giving you a starting point to learn from.
Recording Your First Macro
Before you record your first macro, you’ll need to ensure that the ‘Developer’ tab is enabled in your Excel environment. This tab gives you access to more advanced features, including VBA, which we’ll need for our macros.
Here’s how to enable it:
- Right-click on any part of the ribbon, then select ‘Customize the Ribbon…’.
- In the Excel Options window that pops up, look at the list of ‘Main Tabs’ on the right.
- Check the box for the ‘Developer’ tab, then click ‘OK’.
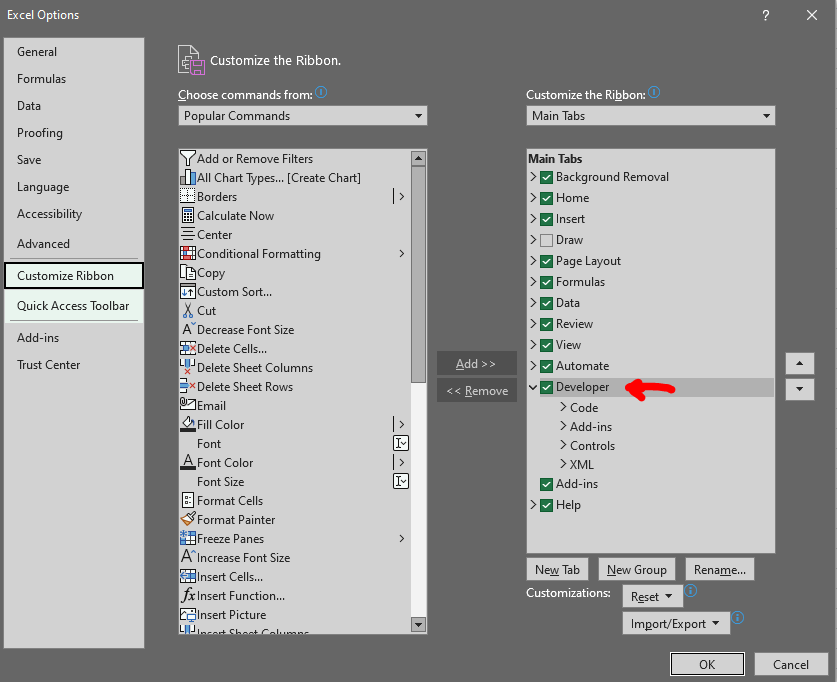
You should now see the ‘Developer’ tab in your Excel ribbon. From here, you’ll be able to access the VBA editor and record macros.
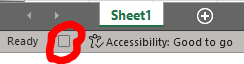
To get started, either make your way to the developer tab we just enabled, or head over to the ‘View’ tab on the Excel ribbon, and you’ll find the ‘Macros’ section. Click on ‘Record Macro’ and click ‘OK’ perform some actions (like formatting cells or entering data), then stop the recording with the small square in the lower left corner of your screen. Congratulations, you’ve just created your first macro!
Understanding Your Macro
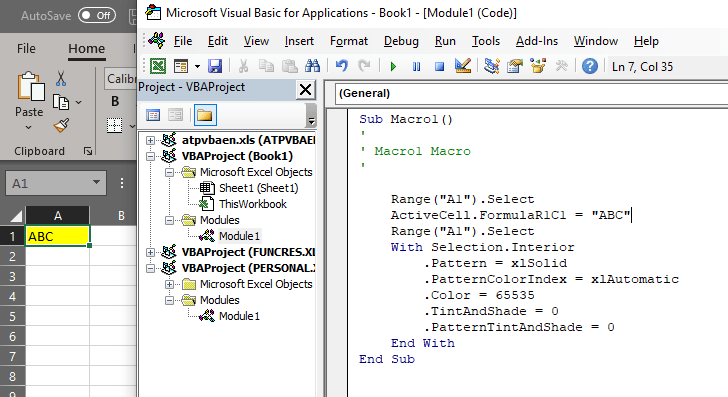
Now, the fun part: understanding the code. Open the VBA editor by pressing ALT + F11, then navigate to ‘Modules’ on the left panel (If you’re reading this, it’ll likely be Module1). Double click the module name. Here, you’ll find the VBA code that Excel generated for you. It might seem like gibberish at first, but let’s break it down.
Every macro begins with Sub MacroName() and ends with End Sub. Everything in between these lines is the actions you performed, translated into VBA code. For example, Range("A1").Select means that the cell A1 is being selected, while ActiveCell.FormulaR1C1 = "ABC" means that the text “ABC” is being entered into the selected cell. The rest is just how Excel deals with applying the yellow fill to the cell’s background (With the Selection‘s Interior, change these attributes, End With).
It’s okay if you don’t understand all the syntax and commands right away (if you do, you probably don’t need to spend too much time on this particular post). The purpose of this exercise is to familiarize yourself with the environment and get a general feel for how VBA code looks.
Try making some changes to your recorded macro. Maybe change the cell reference or the text being entered. After making your changes, you can run your modified macro by pressing F5 while in the VBA editor, or by going back to Excel, clicking ‘View Macros’, selecting your macro, and hitting ‘Run’. It never hurts to try things out as long as you’re not experimenting on something you actually need, which brings us to….
Understanding Recorded Macros: A Deeper Dive
After getting your feet wet with recording and viewing macros, it’s time to dive a bit deeper. It’s one thing to record a macro and then look at the code afterward, but a truly enlightening experience is to see how your actions are translated into VBA code in real-time. This can give you a much clearer understanding of how Excel interprets your actions, and it’s a great way to start learning the VBA language.
Side-by-Side Recording
One of the most effective ways to do this is to record a macro with the VBA editor open in a side-by-side view. Here’s how you can do it:
- Open the VBA editor by clicking on ‘Visual Basic’ on the Developer tab.
- Position the VBA editor and the Excel window so that you can see both at the same time. A quick way to achieve this is by using the side-by-side feature in Windows: select one window, press the Windows Key + Left Arrow to dock it to the left half of your screen, and then click the other window to fill the right half. Alternatively, you can have one of them in a smaller window in the corner of your screen. The goal is to maintain visibility of both windows simultaneously.
- Go back to Excel and start recording a macro while you work in Excel as usual.
As you perform actions in Excel, you’ll see the VBA code being generated in real-time in the VBA editor. This allows you to connect your actions directly with the code that’s generated.
For example, if you select a cell, you’ll see a line of code like Range("A1").Select. If you then change the color of the cell, you’ll see an additional line of code like Selection.Interior.Color = RGB(255, 0, 0), or a with statement like we saw above. You can literally see how Excel translates your actions into VBA code.
Learning from Your Everyday Tasks
One powerful way to accelerate your learning is to record macros while you’re doing your regular work in Excel. You’re likely performing a variety of tasks, many of which could be automated. By recording these tasks that you’re already familiar with, you can start to see how they could be turned into macros.
After you’ve recorded a task, take some time to look at the VBA code and try to understand it. Try to connect each line of code with the corresponding action you performed. This is a great way to start learning VBA syntax and understanding how Excel translates your actions into code.
Of course, not every action you perform will translate neatly into a useful macro, and the recorded code might not always be the most efficient way to perform the task. But this is a valuable learning process that will help you start to understand how VBA works, and how you can start writing your own macros from scratch.
An Introduction to VBA Syntax
In this section, we’ll delve a bit deeper into the syntax of VBA – the rules and structures that make up the language. We’ll start by discussing the elements you’re likely to encounter while recording macros, before moving on to simple examples of commonly used syntax to optimize recorded macros.
Understanding Basic Syntax
The key components of VBA syntax you’ll encounter while recording are:
- Methods: These are the actions that VBA performs. For example, ‘Select’, ‘Copy’, ‘Paste’ are all methods that perform specific operations.
- Properties: These are the characteristics or attributes of an object. They define the state of the object. For example, the ‘Value’ of a cell, or the ‘Name’ of a worksheet are properties.
- Objects: Everything in Excel that you can interact with is an object. This includes the application itself, workbooks, worksheets, ranges, and even individual cells.
When recording, you’ll often see syntax like Worksheets("Sheet1").Range("A1").Select, where ‘Worksheets(“Sheet1”)’ is the object, ‘Range(“A1”)’ is a property of the worksheet object, and ‘Select’ is the method being applied.
Examples of Basic Optimizations
Once you’ve recorded a macro, there are several simple ways you can optimize the code:
- Avoid Select: One of the first steps to optimizing a recorded macro is to reduce the use of the ‘Select’ method. While ‘Select’ is useful when you’re manually interacting with Excel, in VBA it’s often unnecessary and can slow down your macros. Instead of selecting a cell before interacting with it, you can usually just interact with it directly. For example, instead of
Range("A1").Selectfollowed byActiveCell.Value = "Hello", you can simply useRange("A1").Value = "Hello". - Use Variables: Variables can store values or references to objects, allowing you to reuse them throughout your code without having to type out the full reference each time. This can make your code easier to read, and also faster in some cases.
- Be Explicit with References: When working with multiple worksheets or workbooks, it’s important to be explicit with your references. For example, if you’re working in ‘Sheet1’ but want to copy data from ‘Sheet2’, make sure to specify ‘Sheet2’ in your code. This can prevent errors that might occur if you (or Excel) accidentally switch to a different worksheet or workbook partway through your macro.
Remember, this is just a basic introduction. Like any programming language, VBA syntax is a large and complex topic, and there’s always more to learn. However, by starting to understand and optimize the code in your recorded macros, you’re taking the first steps towards becoming a proficient VBA programmer.
Wrapping Up and Embracing Your VBA Journey
So, we’ve touched upon the intimidating world of Excel VBA, but I hope you come away from this article looking at it not as a daunting, alien landscape, but as an unfamiliar place to explore, filled with potential and waiting to be discovered. I hope that I’ve been able to convey my genuine enthusiasm for this tool, and to kindle in you a spark of curiosity and interest.
The aim of this post was to demystify the VBA environment and help you see that, underneath all the jargon and seemingly complex code, lies a language designed to be intuitive and helpful. We’ve walked through the process of recording macros, observing how our actions get translated into VBA syntax, and we’ve even taken our first steps towards understanding and optimizing that syntax.
Now, you might be thinking, “I’ve followed along, but am I really a VBA programmer now?” Well, the simple answer is: Yes, you are! You may be at the beginning of your journey, but remember, every expert started out as a beginner (most of them with a program that screamed “Hello World!” into a terminal or console window, and if you record one macro that helps you with a task you do often, you’ve certainly leaped that hurdle). This isn’t an overnight transformation, but rather a process of continuous learning, experimenting, and growing.
As you navigate the corporate world, you will find numerous opportunities to flex your newly developed VBA muscles. Each challenge you encounter is not a roadblock, but an invitation to solve a puzzle, a chance to create something efficient and useful, and a chance to learn something new that you can carry with you. And trust me, the feeling of watching your own VBA code spring to life and do your work for you is deeply satisfying.
As I often say, coding is not just a technical skill, but a way of thinking. It’s a creative process that involves understanding problems and crafting solutions. It’s about persistence, about not being afraid to make mistakes, and about learning from them. It’s a journey of discovery, and you’ve taken the first brave steps.
Remember, we’ve only scratched the surface of VBA’s capabilities. As we go further along, I’ll introduce you to more advanced concepts, functionalities, and best practices as they come up in projects. This journey will not always be easy (I basically guarantee you’ll sit there at your keyboard wondering if throwing things would help, or just be counterproductive at some point), but it will be rewarding. In time, you’ll look back at the macros you’re recording (or writing?) now, and you’ll be amazed at how far you’ve come.
I realized after scheduling this article to publish, that I forgot perhaps the most useful and often hilarious bit of syntax! The COMMENT!
VBA uses the apostrophe (‘) as a comment indicator, and anything following it on the same line will be treated as commentary and ignored when the code is being executed. It’s always going to be a best practice to comment what your code is doing, so that you (or the next person) can reference those descriptions when troubleshooting or updating the macro in the future.
There’s also quite a bit of entertainment to be had looking at funny code comments across the internet. I’ve seen (and made) some similar commentary in my own projects in the past, and it’s always a source of amusement. As a start, I found you guys an article with some of my favorite examples:
56 Funny Code Comments That People Actually Wrote by Nehal Khan
Jeff
Until our next coding adventure, happy automating!


Leave a comment