

In today’s digital age, a significant amount of our time at work is spent processing and communicating data. For many of us, this often involves updating reports with new information and sending regular updates via email. The process can be time-consuming and repetitive, especially if we’re manually copying tables into emails or exporting and attaching updated Excel files. But what if there was a way to automate this routine task, freeing up our time for more strategic or creative endeavors?
The good news is, Excel – an application that many of us already use daily – provides a powerful tool to do just that. In a previous article, we explored Visual Basic for Applications (VBA), Excel’s built-in programming language, and how it can be harnessed to automate a wide array of tasks. Today, we’ll dive deeper into the world of Excel automation by introducing a flexible macro designed to automate the process of report generation and distribution. It’s one that I’ve been using versions of for almost a decade for exactly the type of task we just discussed – sending out the finished product after other automation has already been employed to handle the updates.
This macro does more than just automate a series of tasks in Excel. It can export an Excel range as an HTML table so that you can have an overview of the data in the email’s body, save the workbook with a unique name to keep a running history of previous reports, and email the saved workbook as an attachment – and it can all be completely automated. Not only does this increase efficiency because you no longer have to do it manually, but it also minimizes the risk of errors that can occur with manual data handling. Whether you’re generating hourly telephony reports, daily sales reports, or weekly project updates, this macro can be a game-changer.
Stay with us as we break down the macro, explain how it works, guide you through implementing it in your Excel, and help you customize it for your specific needs. By the end of this article, you’ll be well on your way to mastering another powerful tool in Excel’s automation arsenal.
The Distribution Worksheet
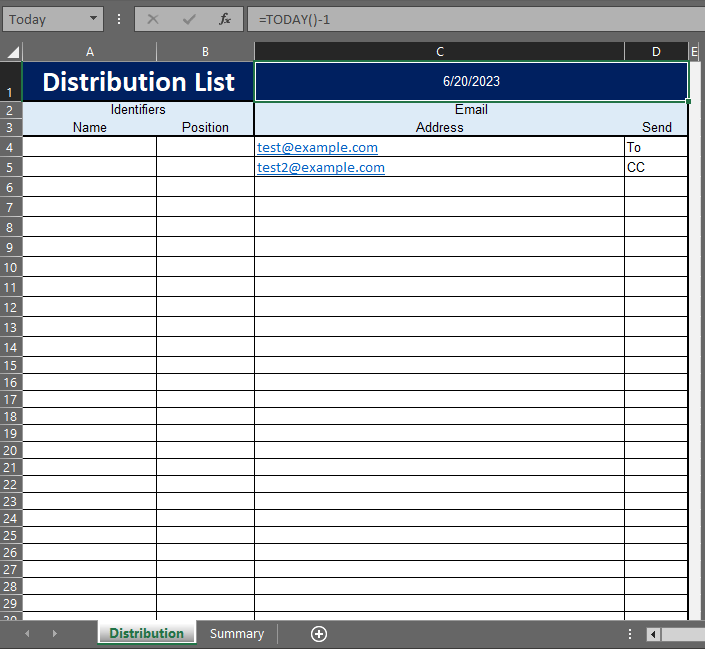
While this macro could work well on its own, adding a distribution worksheet makes more generalized, and makes it much easier to customize for new or additional uses. The worksheet is pretty simple, with the important parts being the named range (Today) in C1:D1, which is just used to specify the date, to be used in the name of the file that’s exported, and the contents of columns C and D. C contains the email addresses that the final output will be sent to, and D contains either To or CC, to determine which block they should be added to.
Decoding the Macro
VBA code, much like any other programming language, can appear as an intimidating labyrinth of strange symbols and words to those not familiar with it. But, once you start understanding the syntax and basic concepts, the seemingly impenetrable code starts to make a lot more sense. It’s a lot like learning a new language – once you understand the grammar and vocabulary, you can start making out the sentences and eventually understand the entire conversation.
The macro we’ll be discussing is a detailed script that automates a common business process – taking an updated report, saving it, and then emailing that report to a distribution list. This is a complex macro, and rather than just provide the code and an overview of what it does, we’ll dissect it section by section, explaining each part of the code in detail. We’ll discuss what each line does, why it’s important, and how it contributes to the overall functionality of the macro. This detailed understanding will not only help you utilize this macro, but also help you modify it to fit your own needs, or even create your own macros in the future.
Without further ado, let’s dive in!
Getting Started
Sub saveAndSendWithAttachment()
On Error Resume Next
Application.ScreenUpdating = False
Application.DisplayAlerts = False

Sheets("Distribution").Select

S1 = "Summary"
S5 = "Distribution"
W1 = ActiveWorkbook.Name
FP = "\\path\to\export\"
W2 = WorksheetFunction.Text(Range("Today"), "yyyy.mm.dd") & " - ReportName" & ".xlsx"
FN = FP & W2
Detailed Breakdown
The script begins with a Sub procedure declaration, Sub saveAndSendWithAttachment(), which is simply the name of the macro.
On Error Resume Nextis an error handling statement which tells Excel to ignore any errors and continue running the script. This is useful in situations where potential errors won’t affect the overall execution of the script, but should be used sparingly as it can hide errors that you might want to know about.Application.ScreenUpdating = FalseandApplication.DisplayAlerts = Falseare used to turn off screen updating and alerts while the macro is running. This makes the macro run faster and provides a smoother experience for the user by not displaying any pop-up messages or UI updates (fast macros can look like a bad lightshow without disabling UI updates) that might normally occur.Sheets("Distribution").Selectselects the “Distribution” worksheet in the active workbook, so that we can grab the value of the date in the “Today” cell a few lines later, and subsequent lines set up some variables for later use.S1 = "SheetName"andS5 = "Distribution"are storing the names of the worksheets that will be referenced later in the script.W1 = ActiveWorkbook.Namestores the name of the current workbook.FP = "\\path\to\export\"sets the file path where the workbook will be saved.W2 = WorksheetFunction.Text(Range("Today"), "yyyy.mm.dd") & " - New Accounts Last 14 Days" & ".xlsx"generates the name for the new workbook that will be created, using the current date from the workbook’s named range (“Today”) in “yyyy.mm.dd” format and adding a specific text string to it to fill outFN = FP & W2combines the file path and workbook name to create the full path for the new workbook.
To wrap up this first section, the macro prepares for the tasks to come by turning off some Excel settings and setting up key variables. In the following sections, it will use these to carry out more complex tasks.
Preparing and Exporting the Report File
The next section we are focusing on prepares and exports the report file which will be attached to the email later. This section of the script makes a copy of the Summary sheet, paste it as values, fits the columns to the data, and saves this as a new workbook. Here is the relevant block of code:
'Export and prepare the report file that you'll be attaching later.
'Use this space to define how you are going to export your actual report file. Typically, I would do something like the following:
    Sheets(S1).Select
    Sheets(S1).Copy
    Cells.Select
    Selection.Copy
    Selection.PasteSpecial Paste:=xlPasteValues, Operation:=xlNone, SkipBlanks:=False, Transpose:=False
    Cells.EntireColumn.AutoFit
    Application.CutCopyMode = False
    Range("A1").Select
    'This setup leaves you with the exported report open, so that it can be renamed, saved, and closed by the next few lines.
'Export and Save
    W3 = ActiveWorkbook.Name
    Workbooks(W3).SaveAs Filename:=FN
    Workbooks(W2).Close
Detailed Breakdown
Sheets(S1).Select: The ‘Summary’ sheet is selected, as designated by the string value in theS1variable.Sheets(S1).Copy: The ‘Summary’ sheet is copied.Cells.SelectandSelection.Copy: These commands select all cells and copy their content.Selection.PasteSpecial Paste:=xlPasteValues: This command pastes the copied content as values, stripping out any formulas and leaving only the resultant values. This is crucial as the report recipient might not have access to the data sources referred to by the formulas, making them ineffective and potentially error-prone.Cells.EntireColumn.AutoFit: This command adjusts the width of all columns to suit the contents of the cells properly.Application.CutCopyMode = False: This line removes the “marching ants” border that highlights copied cells. It’s a clean-up action to leave the workbook in a tidy state.Range("A1").Select: This command selects cell A1. It’s often done to remove the selection from any extensive ranges or particular cells that may have been the focus during the macro.W3 = ActiveWorkbook.NameandWorkbooks(W3).SaveAs Filename:=FN: After preparing the report, it’s saved with a specific filename (FN), which is a combination of the path (FP) and file name (W2).W3stores the name of the active workbook, which has just been copied and prepared.Workbooks(W2).Close: The final action in this section is closing the newly created workbook (W2), which has now been saved at the location specified byFN. After this line, the workbook is closed and saved in your chosen location.
Overall, this section of the code prepares an Excel report by copying a specific worksheet, stripping any formulas to leave only values, fitting the columns to the data for readability, and then saving this as a new workbook. The new workbook is saved in a specified location, with its filename containing the current date and a description (“Report”). After the process, the newly created workbook is closed, and the original workbook that contains the macro continues to remain open for further use.
Configuring the HTML Table for the email body
Next up, we have a section of code that defines a range of cells in a worksheet to be converted into an HTML table. The range is then copied and pasted into a temporary workbook, which is then saved as an HTML file, and the HTML content of the table is extracted and stored as a string. Finally, the temporary HTML file is deleted. This is a good way of getting a pre-built HTML table ready for insertion into an email through outlook, and that’s exactly how it’s used here.
'Configure HTML Table
Sheets(S1).Select
URange = "A1:H50"

'HTML Table
Dim HTMLTable As Range
Set HTMLTableA = Workbooks(W1).Worksheets(S1).Range(URange)
Dim TempFile As String
TempFile = Environ$("temp") & "\" & Format(Now, "mm.dd.yy hh-mm-ss") & ".htm"
Dim TempBook As Workbook
Set TempBook = Workbooks.Add(1)

HTMLTableA.Copy
With TempBook.Sheets(1)
    .Cells(1).PasteSpecial Paste:=8
    .Cells(1).PasteSpecial xlPasteValues, , False, False
    .Cells(1).PasteSpecial xlPasteFormats, , False, False
    .Cells(1).Select
    Application.CutCopyMode = False
End With

With TempBook.PublishObjects.Add(SourceType:=xlSourceRange, _
    Filename:=TempFile, _
    Sheet:=TempBook.Sheets(1).Name, _
    Source:=TempBook.Sheets(1).Range("A1:H50").Address, _
    HtmlType:=xlHtmlStatic)
    .Publish (True)
End With

HTMLTableB = CreateObject("Scripting.FileSystemObject").GetFile(TempFile).OpenAsTextStream(1, -2).ReadAll
CreateObject("Scripting.FileSystemObject").GetFile(TempFile).OpenAsTextStream(1, -2).Close
HTMLTableB = Replace(HTMLTableB, "align=center x:publishsource=", "align=left x:publishsource=")
TempBook.Close savechanges:=False
Kill TempFile
Line by Line Breakdown:
Sheets(S1).SelectandURange = "A1:H50": These lines select the Summary worksheet and set the range to be converted into an HTML table.Set HTMLTableA = Workbooks(W1).Worksheets(S1).Range(URange): This setsHTMLTableAas the range defined in the Summary sheet of the active workbook.TempFile = Environ$("temp") & "\" & Format(Now, "mm.dd.yy hh-mm-ss") & ".htm": This creates a unique temporary HTML filename using the current date and time.Set TempBook = Workbooks.Add(1): This line creates a new workbook and assigns it to theTempBookvariable.- The
With TempBook.Sheets(1)...End Withblock copies theHTMLTableArange and pastes the values and formats into the first sheet ofTempBook. - The next
With TempBook.PublishObjects.Add...End Withblock exports the content ofTempBookto the temporary HTML file. HTMLTableB = CreateObject("Scripting.FileSystemObject").GetFile(TempFile).OpenAsTextStream(1, -2).ReadAll: Reads the HTML file and stores its content inHTMLTableB.CreateObject("Scripting.FileSystemObject").GetFile(TempFile).OpenAsTextStream(1, -2).Close: Closes the text stream of the HTML file.HTMLTableB = Replace(HTMLTableB, "align=center x:publishsource=", "align=left x:publishsource="): This line alters the HTML code of the table to align the text to the left. It achieves this by replacing thealign=centerattribute in the HTML file withalign=left.TempBook.Close savechanges:=False: This line closes the temporary workbook without saving any changes.Kill TempFile: This deletes the temporary HTML file that was created. This is generally a good practice, as it ensures that your code doesn’t leave behind unnecessary files each time it runs.
Building out the rest of the email
The next several lines is where we’ll configure any standard verbiage for our email body (to go above and below the HTML table), and build out the “To” and “CC” lists that the email will be sent to.
'Body
Dim M0 As String
M0 = M0 & "<br>" & "<br>" & "(AUTOMATED EMAIL)"

'Signature & Disclaimer
Dim M2 As String
M2 = M2 & "<br>" & "<br>"

'To
FA = 4
R1 = ""
R2 = ""
Do Until Workbooks(W1).Worksheets(S5).Cells(FA, 3) = ""
    If Workbooks(W1).Worksheets(S5).Cells(FA, 4) = "To" Then
        If R1 = "" Then
            R1 = Workbooks(W1).Worksheets(S5).Cells(FA, 3)
        Else
            R1 = R1 & "; " & Workbooks(W1).Worksheets(S5).Cells(FA, 3)
        End If
    End If
    If Workbooks(W1).Worksheets(S5).Cells(FA, 4) = "CC" Then
        If R2 = "" Then
            R2 = Workbooks(W1).Worksheets(S5).Cells(FA, 3)
        Else
            R2 = R2 & "; " & Workbooks(W1).Worksheets(S5).Cells(FA, 3)
        End If
    End If
FA = FA + 1
Loop
Detailed Breakdown
- The string
M0is declared and initialized. This string will act as the main body of the email. It’s begun with an automated email disclaimer in the example, but can be configured with whatever text you want to include. - A string
M2is declared and set up. It will serve as a signature or a disclaimer that is appended at the end of the email. In this case, it’s initialized as an empty space. - Variables
FA,R1, andR2are initialized.FAis set to 4 and will act as an iterator to go through the rows in the “Distribution” worksheet, starting from the fourth row.R1andR2are set as empty strings that will hold the email addresses for the “To” and “Cc” fields respectively: - The macro enters a loop that continues until it finds an empty cell in the third column (C) of the “Distribution” worksheet. Within this loop:
- The macro checks the value in the fourth column (D) of the current row.
- If the cell value is “To”, it adds the email address from the same row’s third column to the
R1string. - If the cell value is “CC”, it adds the email address to the
R2string. - Email addresses are separated by semicolons.
- After each iteration,
FAis incremented by 1, moving the focus to the next row.
Creating and Sending the Final Report
The final section of the macro is actually rather simple, relying on Microsoft’s built-in functions to create and send the email with all the previously constructed elements.
'Send Email
Dim OutApp As Object
Dim OutMail As Object
Dim strbody As String
Set OutApp = CreateObject("Outlook.Application")
OutApp.Session.Logon
Set OutMail = OutApp.CreateItem(0)
    With OutMail
        .To = R1
        .CC = R2
        .HTMLBody = M0 & HTMLTableB & M2
        .Subject = "Email Subject"
        .Attachments.Add (FN)
        .Send
'        .Display 'Only uncomment this line if you want to see the email instead of sending it automatically. Good option for testing.
    End With

Application.ScreenUpdating = True
Application.DisplayAlerts = True

End Sub
Detailed Breakdown
- The
OutAppandOutMailobjects are declared, along with thestrbodystring.OutAppwill be used to create an instance of the Outlook application, andOutMailwill be used to create a new mail item in Outlook. OutAppis set as a new instance of the Outlook application, and a session is logged on.OutMailis set as a new mail item created within the Outlook application.- The body of the email (
To,CC,HTMLBody,Subjectfields and attachments) is then set within aWithblock. TheHTMLBodyis set to the combination ofM0,HTMLTableB, andM2. The attachment added is the file saved earlier, represented by the filename stored in theFNvariable. Finally, the.Sendmethod is used to send the email. Application.ScreenUpdatingandApplication.DisplayAlertsare set toTrue. This reactivates screen updates and alerts which were initially turned off at the beginning of the code.- The subroutine ends with
End Sub.
Whew. Finally made it!
That’s a wrap! No one ever said coding was easy, but oh boy, isn’t it rewarding? We’ve travelled together through the intricacies of this macro, leaving no stone unturned, and hopefully leaving you with a more profound understanding of how the code works and how you can apply this or a similar structure to your own work.
Understanding code is like learning the lyrics to your favorite song – it might take a few listens (or reads, in this case), but once you know it, you can sing it in your sleep! But why is this comprehension so crucial? The answer lies in the flexibility it affords you.
The magic of learning to code is in the flexibility it gives you with things it create. Unlike most of the less technical automation options, code is a bit different. Sure, it’s complex, but its ability to be bent, twisted, and reshaped to suit our needs means we can start with a standard pattern like the macro we’ve reviewed today, and adjust it to fit a wide variety of needs. This macro is no exception. It’s been designed in a way that allows you to modify it to fit your unique requirements. Whether you want to tailor the email body, change the data source, skip the attachment, export a file with several worksheets instead of the one that we’ve shown here, or alter the report format entirely, understanding the structure and functions of the code is the key to making those modifications.
With your newfound comprehension, you’re no longer just a user of the code – you’re its master. Whether you need to add functionality, remove unnecessary bits, or adapt it to a completely new use-case, the power is now in your hands.
In conclusion, let’s celebrate not just the completion of our walkthrough but also the power you’ve gained through understanding. With knowledge comes the ability to create, to innovate, and to adapt. As you move forward, let the versatility of this macro inspire you to create your own, with a focus on building things that can be used for more than one task – defining those patterns lets you focus on optimization, rather than reinventing the wheel each time something new comes along.
Happy coding!
For those who are planning to copy/paste, here’s the full text of the macro. 🙂
Jeff
Sub saveAndSendWithAttachment()
On Error Resume Next
Application.ScreenUpdating = False
Application.DisplayAlerts = False

Sheets("Distribution").Select

S1 = "Summary"
S5 = "Distribution"
W1 = ActiveWorkbook.Name
FP = "\\path\to\export\"
W2 = WorksheetFunction.Text(Range("Today"), "yyyy.mm.dd") & " - Report" & ".xlsx"
FN = FP & W2
FN2 = SP & FN

'Export and prepare the report file that you'll be attaching later.
'Use this space to define how you are going to export your actual report file. Typically, I would do something like the following:
    Sheets(S1).Select
    Sheets(S1).Copy
    Cells.Select
    Selection.Copy
    Selection.PasteSpecial Paste:=xlPasteValues, Operation:=xlNone, SkipBlanks:=False, Transpose:=False
    Cells.EntireColumn.AutoFit
    Application.CutCopyMode = False
    Range("A1").Select
    'This setup leaves you with the exported report open, so that it can be renamed, saved, and closed by the next few lines.
'Export and Save
    W3 = ActiveWorkbook.Name
    Workbooks(W3).SaveAs Filename:=FN
    Workbooks(W2).Close
'Configure HTML Table
Sheets(S1).Select
URange = "A1:H50"

'HTML Table
Dim HTMLTable As Range
Set HTMLTableA = Workbooks(W1).Worksheets(S1).Range(URange)
Dim TempFile As String
TempFile = Environ$("temp") & "\" & Format(Now, "mm.dd.yy hh-mm-ss") & ".htm"
Dim TempBook As Workbook
Set TempBook = Workbooks.Add(1)

HTMLTableA.Copy
With TempBook.Sheets(1)
    .Cells(1).PasteSpecial Paste:=8
    .Cells(1).PasteSpecial xlPasteValues, , False, False
    .Cells(1).PasteSpecial xlPasteFormats, , False, False
    .Cells(1).Select
    Application.CutCopyMode = False
End With

With TempBook.PublishObjects.Add(SourceType:=xlSourceRange, _
    Filename:=TempFile, _
    Sheet:=TempBook.Sheets(1).Name, _
    Source:=TempBook.Sheets(1).Range("A1:H50").Address, _
    HtmlType:=xlHtmlStatic)
    .Publish (True)
End With

HTMLTableB = CreateObject("Scripting.FileSystemObject").GetFile(TempFile).OpenAsTextStream(1, -2).ReadAll
CreateObject("Scripting.FileSystemObject").GetFile(TempFile).OpenAsTextStream(1, -2).Close
HTMLTableB = Replace(HTMLTableB, "align=center x:publishsource=", "align=left x:publishsource=")
TempBook.Close savechanges:=False
Kill TempFile

'Body
Dim M0 As String
M0 = M0 & "<br>" & "<br>" & "Email Body Header"

'Signature
Dim M2 As String
M2 = M2 & "<br>" & "<br>" & "Email Body Footer or Signature"

'To
FA = 4
R1 = ""
R2 = ""
Do Until Workbooks(W1).Worksheets(S5).Cells(FA, 3) = ""
    If Workbooks(W1).Worksheets(S5).Cells(FA, 4) = "To" Then
        If R1 = "" Then
            R1 = Workbooks(W1).Worksheets(S5).Cells(FA, 3)
        Else
            R1 = R1 & "; " & Workbooks(W1).Worksheets(S5).Cells(FA, 3)
        End If
    End If
    If Workbooks(W1).Worksheets(S5).Cells(FA, 4) = "CC" Then
        If R2 = "" Then
            R2 = Workbooks(W1).Worksheets(S5).Cells(FA, 3)
        Else
            R2 = R2 & "; " & Workbooks(W1).Worksheets(S5).Cells(FA, 3)
        End If
    End If
FA = FA + 1
Loop

'Send Email
Dim OutApp As Object
Dim OutMail As Object
Dim strbody As String
Set OutApp = CreateObject("Outlook.Application")
OutApp.Session.Logon
Set OutMail = OutApp.CreateItem(0)
    With OutMail
        .To = R1
        .CC = R2
        .HTMLBody = M0 & HTMLTableB & M2
        .Subject = "Email Subject"
        .Attachments.Add (FN)
        .Send
'        .Display 'Only uncomment this line if you want to see the email instead of sending it automatically. Good option for testing.
    End With

Application.ScreenUpdating = True
Application.DisplayAlerts = True

End Sub


Leave a comment